
|
|
|
WELCOME TO THE E-MAXX FAQ THIS IS AN IN DEPTH GUIDE TO THE TRAXXAS E-MAXX 3906, 3905/3903 & 3908, WITH DETAILED INFORMATION & EXPLANATIONS ABOUT EVERY AREA OF THE TRUCK, EXPLAINING THE KEY DIFFERENCES BETWEEN MODELS. HOPEFULLY THIS SHOULD HELP TO ANSWER MANY OF THE QUESTIONS THAT NEWER OWNERS AND LESS EXPERIENCED HOBBYISTS MAY HAVE ABOUT THEIR PARTICULAR EMAXX. |
|
| CONTENTS:
1. Chassis 3905 & 3908 Traxxas improved the design somewhat with a Revo type sealed diff and additional spider gear support, but the cup and case are still plastic. Unfortunately there are no aftermarket cases that will fit at present, though FLM sell a metal cup that will remove the flex of the stock setup. You can use any upgrade for the 3906 Emaxx diffs on the new truck provided you use the older style case and internals- therefore making the newer diffs and case redundant. 7. Steering Knuckles & suspension 3906 The stock items are generally fine, though they do use rather small bearings to support the stub-axles. Numerous aftermarket companies sell suitable upgrades, though they tend to use the smaller bearings still. The best upgrade is a 3.3spec one as I alluded to before- knuckles, turnbuckles and driveshafts are required. You cannot use 3.3spec driveshafts or CVDs with the older style of knuckle. UE sell a very nice design of knuckle and suspension known as RacerX for the rear of the truck, and some advanced geometry is used in their extended suspension arms. RPM also sell a new design of rear suspension arms for the maxx trucks that eliminates the turn buckles- these use 3.3spec driveshafts (use a longer screw and nyloc nut when mounting the shocks). 3905 & 3908 Again, the stock design is pretty solid, though the pillow balls are known to pop out sometimes due to the soft plastic used in the knuckles- RPM knuckles are even softer it is worth noting, but they tend not to break so easily. Aluminium knuckles are a great upgrade, though this does remove a weak link from the truck, and will shift potential damage to other areas in a crash or cartwheel etc. RPMs rear suspension upgrade is good for people who don't like messing with toe angles, as it locks the wheels to 1.5 degrees of toe-in, good for racing and all-round use generally. The stock suspension arms are pretty sound, but RPM offer some nice upgrade items that are almost unbrakeable. Ofcourse, there are also numerous aluminium options too along with Ti arms, it is a matter of personal taste as to which route you take, though RPM arms are very robust and ideal for people who are hard on their trucks. Gorillamaxx suspension is ideal for racers who are after a more truggy like setup. One of the most import areas on any vehicle is the suspension, which determines how well the truck handles. And by handling, I mean accelerating from a stand still, turning through corners at speed, and landing from jumps etc. In order to do all these things well, it is worth investing in a good set of shocks, and a full set of springs if available, plus various weights of shock oil. There are many different shocks available, but I will just cover the main, most popular ones: *Bigbore shocks *Power strokes *Pigback shocks Bigbore shocks dont come as standard with the New E-maxx (or old E-maxx), but they are an optional upgrade available seperately; well worth the investment over the stock 'Ultra shocks'. Having a larger bore allows them to hold a larger volume of oil, which inturn produces a smoother shock absorbing action. The down side is the top cap is known to 'blow-off' when landing some very large jumps, but that is hardly suprising & the solution is to fit stiffer springs. Powerstroke shocks are sold by Proline, and are a very popular upgrade among racers and bashers alike. The advantage of these is there tunability, which is much greater than Bigbores, and they also use a more advanced sytem of springs to absorb small & large bumps (dual rate springs). Piggy back shocks are simialr to ordinary shocks, though they have a small external reservoir linked to the main body of the shock which holds extra oil, thus allowing for extra dampening action. Beyond this there are alloy shocks which are much more robust, but also generally much more expensive, and also shocks with threaded bodies, which allow for an even greater degree of tuning. As a general rule, the thicker the oil you use in the shocks, the slower the damping action (which is good for jumping), so the softer the springs should be, and vicerverser for thinner shock oil. 8. Skid plates 3906, 3905 & 3908 The stock skids do a good job of protecting the underside of the truck, but the front and rear skids also work to tie the bulkheads and chassis braces together, and a stronger material than plastic is required ideally. Aluminium skids are good, but they tend to bend rather than flex in a crash. Titanium (Ti) skids such as those sold by Garc, HCR and now NewEra are much better, and will add much needed strength in critcal areas. There is no centre skid on the old truck, but many companies offer them- any material is fine as it wont be subjected to much damage, only minor scratching. The new truck comes with a nice centre skid, though Newera sells a nice aluminium version too. RPM sell some very nice wear plates for the older truck that protect the existing skids from alot of damage- the centre skid/wear plate will also fit the new truck, but a couple of screw holes wont line up correctly. 9. Steering mechanism 3906 The stock setup is fine essentially, the only real weak point being the weak steering servo, and the weak servo saver. When looking at a new servo, try to find something with over 200oz/in of torque, be it digital or analogue. Metal gears will be more robust than nylon or Karbonite. With the servo saver, you can either take the simpler route and use a Kimbrough large truck model or similar, or opt for a bellcrank setup that has the saver built in, such as the Proline or UE models. There are numerous metal aftermarket models available, and these can add much needed strength and precision with the use of bearings instead of bushings. Another trick is to use dual steering servos (turn the shifting servo into a second steering servo), though this requires abit of modification and imagination, depending on the chassis. 3905 & 3908 In theory this setup should be as good as the Proline or UE version, but sadly it isn't quite there. The trouble is that the cam-loc design of the built in saver is far too tight, and has very little or no give in a crash, thus the plastic gears in the servos get destroyed rather easily. A little dremeling work, or careful shimming of the cam-loc mechanism will release the pressure. Metal geared servos would also be worth looking into; if you use two, then 100oz/in of torque each will be required. To remove the small amount of slop that is present in the stock setup you can do a rather clever modification that used two cam-loc mechanisms and a little dremeling again (CLICK HERE). Any steering setup from the old Emaxx should work on the new truck, and viceversa- a little effort may be required. 10. Wheels and tires 3906 & 3905 The stock setup uses a 14mm hex to mount the wheels onto the stubaxles. Aftermarket hexes and adaptors allow you to use anything between 12 and 23mm- 17mm and 23mm being the most common generally. The advantage here is that a larger hex diameter is less prone to stripping out inside the wheel- you will obviously require a wheel (or rim) that uses the same size hex as the one on the truck. For general use the stock chevron design tire is fine, though there are much better choices for onroad and offroad use, depending on the specific surface (hard dirt, loose soil, grass, tarmac etc). Proline, GRP, Maximizer are but a few of the aftermarket companies offering wheels, tires and hexes. Under BL power and high rpms many tires tend to balloon in diameter, which can cuase them to tear or fly apart, or at the very least cause loss of control. One solution is to use tire foams, and another is to belt the inside of the tire with thick duct tape (turn the tire inside out and run a couple of strips of tape around the tire, being careful not to overlap the edges which would cause imbalance). 3908 The 3908 uses special 17mm hexes to withstand the torque of the MMM system. These hexes have a unique design to them with what are essentially teeth on each side of the hex; these match the hex pattern on the 3.8" rims that comes with the truck. This does mean however that if you wish to use aftermarket 17mm hexes with the stock rims then you will need to file away the teeth from inside the hex on the rims. The tyres on the 3098 are a massive 6.3" in diameter, the same as used on the latest revo & t-maxx 3.3 trucks; taping the insides is highly recommended to reduce ballooning that can lead to exploded tyres at high speed. 11. EVX, EVX2 & MMM Speed controller 3906 The older models of emaxx came with an orange Novak EVX speed controller. This was a very reliable esc that could handle anything from 6 to 14 nimh cells, or 4s lipo with the use of an LVC device (Low Voltage Cutoff). On some occasions it would refuse to run until the peaked voltage of the cells had dropped a little- easiest way to do this is to work the steering back and forth for a minute or two. Newer models of the 3906 Emaxx came equipped with a yellow EVX2. This model is made by traxxas and has a special coating on the PCB to prevent moisture damage- not advised to test its waterproofing by submerging the truck. 3905 Again, despite traxxas's boasting that the blue EVX2 is water proof, it is ill advised to test this too far, as traxxas will charge for repair of any moisture damaged escs. It suffers in general to a lack of voltage handling ability as freshly charged 6 and 7 cell packs can sometimes trip some form of over-voltage protection, though this isn't the case with all EVX2s which is somewhat baffling. It is also recommended that you do not use the on/off switch at the end of a run, but to instead simply unplug the batteries from the esc. Any warranty issues should be dealt with by contacting the Traxxas customer service department. 3908 The 3908 emaxx comes complete with the brilliant CastleCreations MambaMonster ( MMM ) brushless esc and motor system. The esc is rated for 6s lipo or 18 nimh cells, the motor is the NeuCastle 1515 1y 2200kv model, based on the popular Neu of the same specification. The 3908 comes with factory gearing of 17/68 which is good for about 30-35mph with 14 nimh cells or 4s lipo. With the optional 20/68 gearing 40mph is easily possible, but only with good quality lipos; nimhs will not provide sufficient current ( amps )for the esc & motor, and esc damage may occur. This is due to something known as 'ripple current', whereby the voltage from the batteries fluctuates rapidly and drops as the current output increases beyond what it can provide due to high Internal Resistance ( IR ). Lithium batteries have much lower IR levels and so do not overheat or droop their voltage output under such strain ( provided they are of a suitable specification ). With 6s lipo & the correct gearing ( 28/65 ) it is possible to achieve a maximum speed of around 65-70mph, though aerodynamics & tyre choice become critical issues at this speed; strictly for on-road use only. It is very important when choosing lipos to select items with a good specification & that will provide sufficient current for the MMM to operate properly. The esc requires lipos capable of producing atleast 120amps continously, though the more overhead you have, the longer the batteries will live for and the longer your runtime will be ( as an indirect effect the voltage will not drop below the Low Voltage Cutoff ( LVC ) until nearer to the end of the discharge ). To determine how much current your lipos will produce, simply multiply the C rating by the mah capacity & devide by 1000, for example: 20c x 5000mah / 1000 = 100amps, or 40c x 5000mah / 1000 = 200amps. For best results the lipos should be of identical specifications & age/ discharges, though it is perfectly fine to use two different voltage/ cell counts in series, such as a 3s & 2s lipo to achieve 5s lipo ( I like 5s lipo as it is the perfect mix of power and speed when geared for about 40mph ). The MMM esc has numerous programming options & settings that are accessible via the 'CastleLink' programmer. This unit plugs into the rx lead from the esc & connects to a PC to allow changes to be made to various settings such as punch & torque control, LVC settings, timing and start power, brake strength and also throttle curves etc etc; the 3908 does not come with this unit so it is an optional extra costing approximately $25; well worth purchasing. Please see new Castlelink page for indepth info on how to use this device and the best settings- coming soon. 12. Nimh batteries 3906 & 3905 The best way to get good performance from any Emaxx is to use good batteries, as these ultimately determine your runtime and the amount of punch & topspeed your truck will have. When choosing packs, consider the amount of capacity they have in mah (Milli-amp Hours), the cell count/voltage, and the discharge rating if available. Higher mah will mean longer runtime, higher voltage will mean greater topspeed, and a higher discharge rate will mean more punch along with more consistent topspeed and acceleration. There are a great many brands out there, so choosing the best for your needs is somewhat tricky sometimes. In general, try to avoid cheap 6 cell shotgun or stick packs form Ebay, as these are assembled using thin tin strips to join the cells. Good quality brands are IB, EP and ENER-G, though there are many others. It is important not to overheat any battery, or to miss-treat it, as this can lead to ruptured cells or blown endcaps. Be sure to observe the correct polarity when building packs from scratch or adding cells to packs. 3908 CastleCreations does not recommend the use of nimh batteries with the MMM system ( see above ), however the 3908 is provided with a pair of 7 cell 3300mah packs to help you get going; restrict your gearing to the stock 17/68 if you plan to use these packs. For better results, use some higher quality side by side assembled ~4000mah nimh packs, or even 3x 6 cell packs in series ( total of 18 cells ), then you will be able to achieve 35-40mph without the esc suffering from ripple current due to insufficient battery power. This of course will require a special series harness for 2 batteries to be used on one of the esc's battery connectors, and some form of mount for the extra battery to fix it across the rear of the chassis; hence why lipo or A123 batteries will be the best choice to get the most performance from your 3908 emaxx. 13. Titan & NeuCastle motors 3906 & 3905 Older titans seemed to be more resilient to 16.8v use compared to newer titans, though this could just be a matter of perception; more internet users = more reports of failures. At any rate, it is important to use 21-23 turn motors with the emaxx and EVX & EVX2 escs on 14.4 to 16.8v. Using 12 turn motors on Emaxx voltages will result in burnt out motors and escs. There are various upgrades to look at when choosing new brushed motors for the Emaxx, from the $3.50 drill motors all the way upto expensive 19turn racing motors that need rebuilding after every run- the cheaper options tend to be more hardy and last a lot longer, and still give impressive results. KershawDesigns offers more options in the shape of larger motors, such as the 650, 700 HO and 970 sized motors, some requiring a custom motor mount and pinions in order to fit on the 3906 & 3905 transmissions. Performance gains vary, but weight gain definitely increases with the larger motors, and run time drops. 3908 The 3908 uses the brilliant NeuCastle 1515 1y 2200kv motor, based on the original Neu design of the same specification. The motors are made under license to the same spec as the original Neus, but there are various subtle differences that make them much better suited to use in ground based vehicles. The endbells are screwed in place & sealed to prevent the ingress of dirt and dust & to increase durability. The wires are no longer extensions of the windings from inside the motor, instead they are very flexible 10guage wires that can be shortened as required. The motor shaft comes with a large flat spot as standard to make attaching a pinion much easier ( though a drop of blue threadloc is always recommended ), and there is a shield inside the front endbell to prevent mounting screws that are too long from damaging the coating on the windings; screws no longer than 8-10mm are suggested, trim as required. To protect the motor wires, it is best to install the motor with the wires facing either downwards or off to one side, but not directly upwards- in the event you roll or flip the truck without it's shell on you would otherwise damage or strip the insulation from the soft wires. If you are looking for more runtime and cooler temps, it is a good idea to look at the NeuCastle 1518 1y 1800kv motor. This is slightly longer and a lower kv rating compared to the stock 1515 motor, meaning that when used with the same voltage and gearing it will result in a lower wheel speed and lower temperatures due to less current draw. When paired with 6s lipo and suitable gearing the 1518 motor makes for a very potent setup with outstanding torque, lower running temps & longer runtimes- a great motor for speeds in the 40-50mph region, and also for heavier trucks with a lot of after-market aluminium parts and/ or large & heavy tires. 14. V-twin concept It's actually remarkably simple to run a pair of BL systems on one model at the same time- Traxxas certainly didn't create the concept but they did demonstrate it rather well with their 'V-twin' demonstrator model of an Emaxx 3905 fitted with two VXL BL systems. All that is required is a pair of Traxxas VXL systems, a servo Y-harness, and 2 ounces of common sense & initiative. Bolt both motors to the transmission, and connect the escs to the receiver (rx) throttle channel via the servo Y-harness. Then, programme the two escs at the same time to your radio, and that's it. You will need to use the same size pinion on both motors, and ensure the mesh is set correctly- use a piece of paper between the spur and pinion as you mesh them together, to prevent them binding too tightly. To get the best performance from a V-twin it is vital to use good batteries, this generally means a pair of 3cell (3s) lipos. To ensure even discharging on each system, it is a nice idea to use a parallel harness. It essentially is a pair of leads with male plugs at one end, and female at the other, with a wire linking the negative wire on each lead, and the positive leads in the same way. This ensures that the batteries discharge at the same rate, preventing the LVC from kicking in on either system before the other- see below:  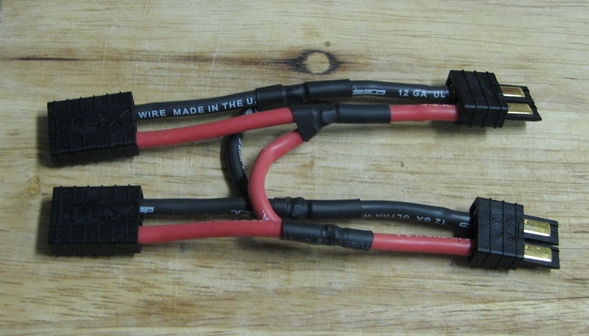 Topspeed is around 55-60mph with good lipos and careful gearing, though it is important to keep a close eye on motor, esc and battery temps. 15. Brushless system upgrades 3906 & 3905 Since Team Novak have ceased to exist I have decided to cull info about their old BL systems- they were never really suited to 1/8 monster trucks to start with anyway. The first step on the BL ladder would probably be a HobbyWing EXRun 80amp esc & 4168 2200kv motor, this system giving more torque & speed potential whilst still having a good price-point. There is also the HobbyWing XERun & EXRUN 150amp escs which usually come bundled with the 4274 2000kv motor; this system gives near-MambaMonster levels of performance with a maximum voltage of 6s lipo possible. It is also entirely possible to build a custom system basically, using a MambaMaxpro (MMPro) esc and a Feigao-type L or XL can motor, along with an external BEC/UBEC (Battery Eliminator Circuitry, powers the Rx and servos). The MMPro will happily run on 6s lipo, though in a heavy MT it is best to restrict the voltage to 4s lipo. The best motors to use would be either the 9L or 10L to get good speed, and the 8XL or 9XL for good speed and more torque. Using a motor with fewer turns/higher KV rating (rpms per volt) will result in higher temps and potential damage to the motor, esc and batteries. 100-180f is generally seen as the safe zone for motors and escs, with 135f or below being optimum. There is an old rule of thumb regarding temps which many will find handy no-doubt: Hot motor + cool esc = under geared. Cool motor + hot esc = over geared. As a general rule this is fine, though it is possible to get different results depending on the esc and motors used- some motors run hot regardless, and some escs are less capable than others to deal with high current draw. It is important to choose a suitable sized and KV motor for MT use- 36-39mm diameter ( not including heatsink fins ), and 60-80mm in length is a good guide. The KV rating will depend on your voltage, but as a general rule again: 2000-2700kv = 4s lipo/ 12-14 cells 1800-2200kv = 5s lipo/ 14-16 cells 1500-2000kv = 6s lipo/16-18 cells If you are planning on using more than 6s lipo, chances are you don't need to be reading this FAQ. Beyond that there are higher end escs such as the MambaMonster (MMM), Kontronic Jazz, Schulze, Hacker mastercar, MGM, and so on. Ideally, you want an esc that can handle upto 6s lipo or more, and is rated for atleast 120amps ideally. High end motors tend to take the shape of Neu 1515 or larger models, Lehner 1940 and larger models, Hacker C50maxx and Feigao XL models, and the Castle-Neu MMM motors, along with the Medusa 60-80mm models, and Megamotor 22/45 series. There are numerous other good quality motors these days that are suspiciously similar to the Neu & NeuCastle motors, such as the offerings from Hobbywing & Leopard motors- good quality motors, but using lesser magnets than the higher quality motors; exploded rotors & higher running temps are likely if you arent careful with the gearing & kv/ size choice for your application. The Plettenberg BigMaxximum used to be concidered the very best of the best, but these days this 4 pole German monster is very overpriced & has a kv rating much too high for use with anything other than 4s lipo- does not make for a very efficient setup at all. The stock AM radio system does a reasonable job with the stock setup, but BL systems tend to create a lot of RF (radio frequency) electrical noise, and AM radios do not like react well, with glitching and loss of range & control a common problem. Best solution is to upgrade to an FM radio at the least, or a digital radio is even better, budget permitting. 3903 & 3908 These trucks now come with the Traxxas 2.4ghz radio system as standard, a very welcome improvement over the ancient AM radio systems. You are still limited to 2 channels ordinarily, but are no longer bound by a limited selection of channels due to the crystal radio system- 2.4ghz technology frees you from interference, glitching & limited radio range, just bind the rx to the tx and away you go. The 3908 model comes with arguably the best BL system available as standard, along with the Traxxas Link 2.4ghz radio system so upgrades in those departments are not really required- the 3903 runs the stock EVX2 brushed esc & 21turn 550 Titans so would benefit from the same BL system upgrades as mentioned for thr 3906 & 3905 models. 16. Lipo and A123 batteries Lipo = lithium polymer. They have a nominal (resting) voltage of 3.7v per cell, and a fully charged voltage of 4.2, but unlike Nimh cells, you can actually select the fully charged voltage provided you have a suitable charger; this is handy for escs that don't like peaked voltages sometimes (MambaMaxx and Quark 125b for example). When charging, and discharging (running them in a vehicle), the individual cells in a pack can become out of balance. This means in a 2s pack for example (s = cells in series), one cell can read slightly higher or lower than the other, and over time this difference can become large enough to mean that one cell becomes over-discharged during use; it is important not to discharge them below 2.8v per cell, but 3.2v is a safer level. This is where the LVC device comes into play, as it cuts the throttle, or reduces power when the cells have drained down to whatever the cut-off voltage is set to. Some LVCs have adjustable voltage settings, and cutoff type (reduced power, warning light, warning buzzer, total shut-off etc), depending on the application; you wouldn't want to loose all power with a plane or heli for example... When charging lipos, the balancer device is used to keep the voltage equal in all the cells of a pack- it can be balancer that works along with the charger, separate from the charger, or you charge through the balancer. The end result is the same though- cells with a lower voltage get extra charge, whilst cells with a higher voltage get drained a little to keep them in line with the others. This is what the little white plug is for that you see sticking out of lipos cell packs, it is the balancing plug/tap. The lipos battery chemistry requires a special technique, called the CC/CV method (constant current/constant voltage). Basically, the charger will pump in a high current (amps) until the cells reach ~4.2v, then they will drop the current but maintain the voltage level until the cells reach and stay at 4.2v, at which point they are fully charged. Over charging is very dangerous, as lipo cells contain alot of energy, and overheating them can be a serious firehazard, hence the items called 'lipo sacks' that should be used to contain any possible damage caused by a burning lipo. The chances of that are rare these days though, and only idiots on youtube tend to burn up lipos for fun. Lastly, the C rating thing. This refers to a lipos maximum discharge rating, and is a multiple of its capacity. For example: A 20c 5000mah pack can put out 100amps ( 20 x 5amps = 100amps, where 1amp = 1000mah ). A 10c 8000mah pack can put out 80amps ( 10 x 8amps = 80amps, and so on ). Choosing the right capacity and C rating is important for any given application, and should be based on how many amps your chosen motor can draw at maximum load. For example, the old Feigao XL motors tend to draw about 80-100amps at peak current levels, so you should select a battery that can supply at least 80amps continuous. Generally though, the motors pull a continuous current of about 10-20amps or thereabouts, so the battery wont see very high drain rates for the whole run, otherwise it would soon over-heat and 'puff'. Once a battery puffs, its pretty much toast, though individual cells that are still okay can be salvaged- a 5s lipo can be reconfigured into a smaller pack of 4s etc. It is worth noting though that high mah capacity lipos with a low C rating at not as capable at discharging large amounts of current compared to a smaller capacity lipo with a higher C rating, this is because the voltage level droops heavily under a high load, due to the lipos low tolerance to high current draw; a higher C rating is always preferable regardless of the packs actual capacity. A123 cells have a very high energy density like Lipo cells, but are inherently safer and 99% indestructible, so do not have to be used with an LVC (low voltage cut-off) device, and can be charged much quicker given the correct equipment is used. Their resting voltage is 3.4v, which makes a 5s configuration ideal for most applications that would normally use 12~14 Nimh cells, or 4s lipo. The downside is that they are limited to 2300mah or so of capacity, so ideally should be ran in a parallel formation such as 5s2p (2 five cell packs connected in parallel to double the Mah capacity but maintain the same voltage as 5 cells). They can be purchased easily by buying a Dewalt 36v battery pack on Ebay, and then following one of the online tutorials which demonstrate how to turn them into RC packs. A new generation of prismatic LifePo4 (A123 chemistry) cells are currently hitting the market. These offer all the benefits of lipo cells in terms of power density and weight/size, but also have the benefit of safer chemistry, faster charge rates, no LVC required and capable of very high current output without puffing or swelling. Currently there are only a handful of vendors for these new batteries; MaxAmps, HobbyKing/HobbyCity, and Protek being then main noteable sources, though given the extortionate mark-up that MaxAmps charges (to pay for all its advertising and sponsorships no-doubt) I would stay clear of them until their prices drop inline with the competition... if they drop that is. There are other similar cells on the market, but most are low discharge, high capacity packs, unsuitable for R/C use. Time will tell on this type of battery, but if other companies start making and selling them for the R/C market, things will be alot brighter. 17. Chargers and balancers Its important to choose a good battery charger that is suitable for charging your type of batteries. Do not go too cheap, as you will inevitably want to upgrade to a better & faster charger in a short space of time. Ideally, you will buy a charger that can handle both lithium based and Nimh cells, that way you are ready for a lipo or A123 upgrade in the future without having to buy a new charger. A good charger will allow you to charge upto 14 cells or 6s lipo, and charge at a 1c rate or higher (1c = batteries mah capacity, 1amp = 1000mah for example). This is important as some chargers have a lower wattage rating than others, and therefore must lower their charge current (in amps) when charging a high voltage battery pack, in order to stay within that wattage rating, EG: A 50watt charger will drop to around 3.5amps when charging a 4s (14.8v) lipo 4000mah pack. To workout how powerful your charger needs to be to charge a pack at 1c, simply multiply the fully charged voltage of your biggest pack, say 6s lipo (25.2v) by its capacity in amps, say 5amps (5000mah), which gives you 126watts. You will therefore need a charger that is rated for about 130watts or more, though generally speaking 50-100watts is more the norm that you will find in terms of mains powered chargers. If your charger is a DC-only type, it will need a power supply that is capable of outputting sufficient amps to power the charger, same rules apply as before basically when looking at power supply specs. An old PC is a good source for a good strong power supply, though it will require some modifications to serve its new function- a quick google search should yield good results for tutorials. Finally are balancers, which were covered before in section 16, but there is a little more to add. When choosing lipo or A123 battery packs with balance taps, it is important to consider the type of tap they come fitted with, as there are a dozen or so different brands/styles, and you may need to find a suitable adaptor so that your lipo battery can be balanced by your balancer. My advice is to choose the most common brand of tap when you are given the option (some stores allow you to choose the brand of tap you want fitted to your packs), and always choose that type whenever you buy new batteries (see below for a compatibility chart) . It is no great hardship to rewire a lipo pack, or to find a suitable adaptor, it just requires a lot of searching around and head scratching usually, but that is the nature of the hobby really; welcome to the wonderful world of RC. 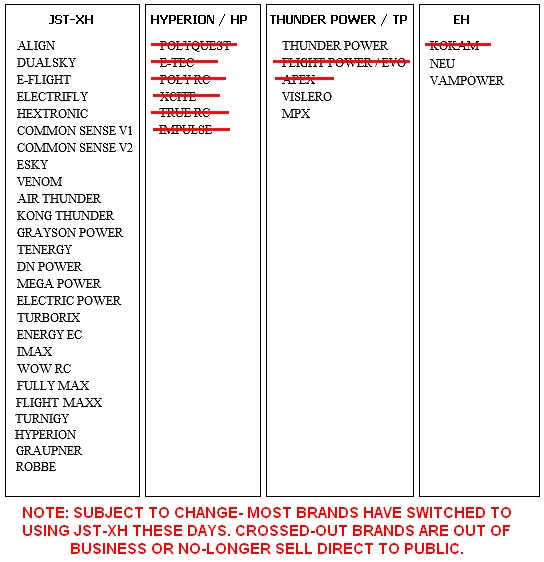 For more technical information & buying advice about Lipos, BL systems and Lipo Batteries, please refer to the Tutorials page. For more 'How-to' guides regarding the E-Maxx trucks and where to find Upgrades and how to implement them, please visit the 'Useful links' page & the 3906 Upgrade guide.
|
|