|
|
|
FOR THE EMPEROR! The Emperor Protects- he also enjoys projects; newest updates at the bottom of each section. | ||||||||||||||||||||||||||||||||||||||||||||||||||||||||||||||||||||||||||||||||||||||||||||||||||||||||||||||||||||||||||||||||||||||||||||
|
|
||||||||||||||||||||||||||||||||||||||||||||||||||||||||||||||||||||||||||||||||||||||||||||||||||||||||||||||||||||||||||||||||||||||||||||
|
|
||||||||||||||||||||||||||||||||||||||||||||||||||||||||||||||||||||||||||||||||||||||||||||||||||||||||||||||||||||||||||||||||||||||||||||
|
|
|
|
|
02/05/25 For the record, I don't play Warhammer, I only played the old Space Hulk game once, but like many I do enjoy the lore, the artwork and the awesome figurines ( even if my stumpy fingers couldn't paint them to save my life), and of course, the endless memes and fan films ( FlashGitz, I'm looking at you ).
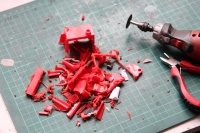
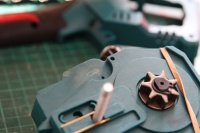
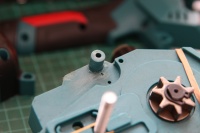
Anyway, I also like the iconic weapon designs ( who'd have guessed.. ), especially the various types of 'Bolters', so seeing as things that go pew are my speciality I will be building a 'functional' Bolter, using an old Nerf Demolisher foam dart blaster. I've built a few Warhammer themed Demolishers before but this one is a bit special as it will be full auto thanks to a solenoid dart pusher
and some clever electronics ( pulse generator and a mosfet ) that will result in a fire-rate of over 10 rounds per second. Technically speaking this blaster was completed 5 years ago, but I decided to give it the Warhammer treatment with a paintjob and other details ( Purity seals and Aquila badges ), and it will serve as a worthy replacement for the abandoned Airsoft bolter project.
AIRSOFT HEAVY BOLTER PROJECT
|
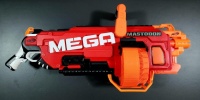
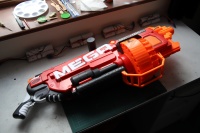
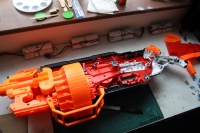
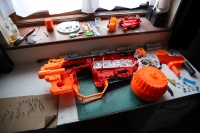
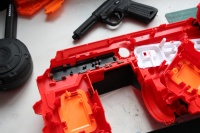
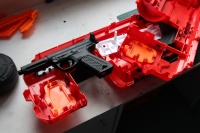
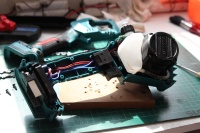
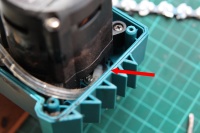
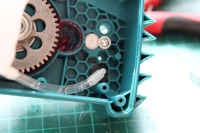
20/10/24 Having changed my mind about how I wanted to proceed with the Bolter, I pivoted to doing something.. bigger. I grabbed a dirt cheap Nerf Mastodon from Ebay and will instead be stuffing the AAP-01 and drum magazine inside of that things shell- with a little work and a good paintjob it will for sure look like a heavy bolter.
Same deal as before, I will gut the internals, use Milliput to bed the pistol in place, and run a linkage to the trigger to operate it. I will use the tracer unit and ammo counter on this project, no issues there even if I have to get a longer RJ45 cable to go between the display and the muzzle piece.
SPACE MARINE HELMET PROJECT
|
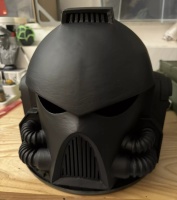
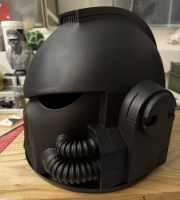
20/10/24 I blame FlashGitz and their 'Furry Crusade' animations; I'm going to build a Space Marine helmet. More specifically, I purchased a 3D printed helmet which was largely prefinished with the filling and sanding work done, allowing me to focus on the remaining touches of adding red lenses for the visor and replacing the original
3D printed tubes with some real rubber tubes, and of course a final paintjob and weathering.
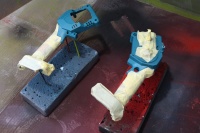
1/12/24 I'm not dead, only on the inside. So, after much procrastinating I finally got stuck in and started hacking up the perfectly good helmet, cutting and tearing off the 3D printed tubes to leave the helmet 'smooth' and ready for car body filler and sanding. Next update will be more interesting, I promise.
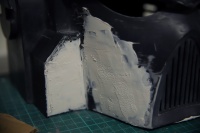
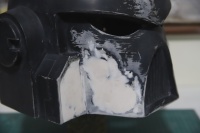
2/12/24 Huh-ha, next day update. With the helmet sufficiently mutilated I went about making it look even worse by slathering on some car body filler in excessive quantities because I lack skill and moderation.
Once that dried I went to town sanding and filing it down until it was fairly smooth and identified some low spots ( and a few remaining high spots in the original rough finish that required sanding down a little ) which required additional work to sort out.
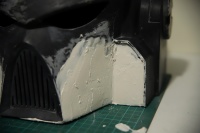
I applied a little more filler, this time being careful not spread on such a thick and gloopy layer meaning it would take much less effort to get a final smooth finish after sanding. Next updates will be a final sanding hopefully, then moving onto installing the new tubes, painting, and installing the visor. Stay tuned...
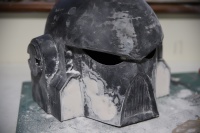
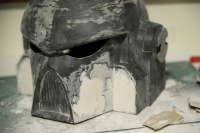
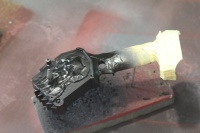
24/12/24 After applying the final coat of filler I was able to get it sanded down pretty smooth nice and easily, ready for ruining it again by drilling 8 large holes for the future air hoses.
After some careful-ish measuring and marking I used a one inch Forstner bit to drill the holes, getting most of them in the right place though I did have to do some minor tweakage with a dremel and grinding burr as I had drifted slightly on one of the holes- this little oopsie won't be seen by the end so it's all good.
The holes are then stuffed with masking tape ( so that glue will adhere properly in the future ) ready for the first coat of primer, which is where this update ends but the next one shouldn't take too long ( famous last words ).
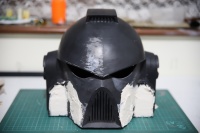
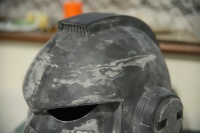
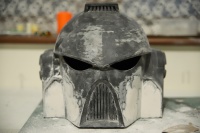
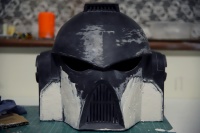
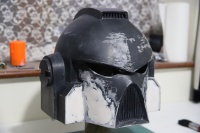
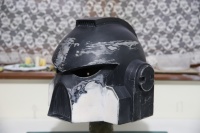
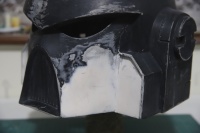
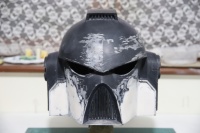
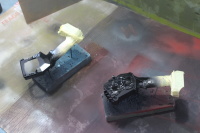
31/01/25 Did I say final coat of filler? I lied! Anyway, I started this session with a coat of black paint so I could get an idea of how smooth the finish really was and identify any areas that needed more work.
Before that though, I decided to ruin the nice paint job again by modifying the shape of the holes I made previously so that the tubes would fit more nicely; success, the tubes do indeed fit nicely.
Speaking of tubes, on the third time of trying I finally found what I wanted all along, nice flexible foam rods that didn't kink or bend awkwardly- I ended up with neoprene foam rods intended for insulating gaps in buildings; if it works, it works.
So, with that sorted I set about doing what will actually be the last round of applying filler to smooth out some ugly marks I missed/created previously. Next up will be final sanding, painting, weathering, installing tubes and lenses.
I'm on holiday soon so I'll have plenty of time to work on this- progress has been slow due to being busy at work and getting home when it's cold, dark and wet, not ideal for putting me in the creative mood :P
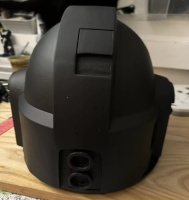
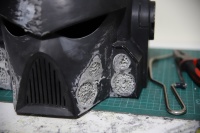
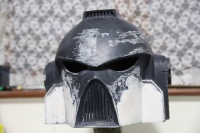
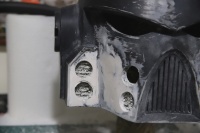
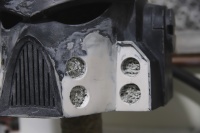
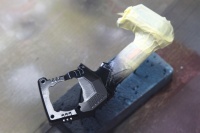
13/02/25 Final sanding is done, minus a small amount of work I made for myself by deciding I wanted to remove the small grills in the top of the helmet vent- I should have done this at the start but hey-ho, I'm a masochist.
I used my rotary tool to cut the little grill out and then smoothed out the new opening with Milliput- I like the result, just looks a little cleaner and is more inline with the FlashGitz Black Templar design.
Just before that I reinforced the holes drilled into the helmet for the tubes by also using a little Milliput, let that dry and applied the final couple coats of black paint; any ugly spots and unevenness at this point I'm just calling battle damage and weathering because I've had enough of bondo and sanding.
I also started on detailing and weathering by dry-brushing a little silver paint along prominent edges, and the first coat of dark grey on the mouth grill ( Vox caster? ). I'll have a little more painting to do, then it's onto the tubes, visor and foam cushioning on the inside for my head to fit snuggly. We're getting there, slowly but surely.
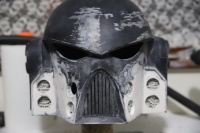
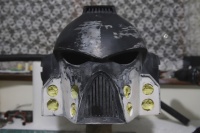
19/02/25 I meant rapidly, we're getting there rapidly- the tubes are cut and painted to match the mouth grill, turns out Humbrol enamel is actually very flexible when painted on foam, which is a nice surprise.
The visor has been made by cutting up a cheap poker sun-visor thing, way cheaper than some of the options people are using and looks just as good, that was then glued in place with some thick CA glue to avoid dribbles.
Next up I need to cut and glue the padding for my noggin, and finally add the tubes- saving that till last to make handling the helmet easier. We are tantalisingly close to being finished now, finally..
18/03/25 This will be the penultimate update, the helmet is now finished and I just have to take the final photos. In the mean time I discovered that Enamel paint is in fact NOT flexible at all, it just seemed like it was because it wasn't completely dry;
as soon as I went to install the painted foam tubes the paint cracked to pieces and flaked off, which was wonderful to watch. So, I decided to revisit the original flexible plastic hose and what do you know, as if by magic it wasn't hard to fit it into place at all so long as I cut it to length correctly
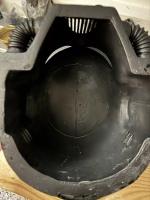
( a little extra length so that it didn't pop out of place ). Well, with that decided I cut 4 pieces to length, shoved them into their respective holes and secured them with Sicaflex ( black rubber silicon type stuff ) on the inside of the helmet, then had a little think about helmet padding.
I originally planned to use memory foam for the padding, but the ebay seller sent me cheap blue upholstery foam which was super awesome of them, yeah. Instead I picked up some black EVA foam to make more firm padding so that the helmet didn't swivel around on my head so easily ( I tested with the blue foam and it was too soft ), layering it up with some thin grey foam for a more precise fit.
It isn't a perfect fit and there isn't enough vertical space for a more fitted solution like you would have with a motorbike, army or builder's helmet, but it's good enough for me, as always. Next update is final photos, see you soon...
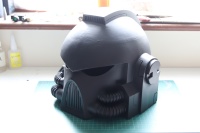
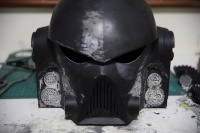
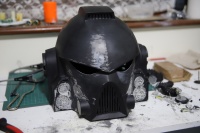
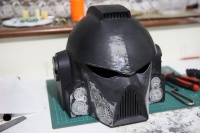
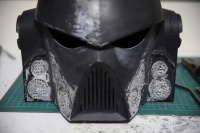
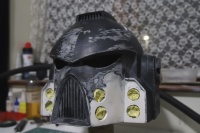
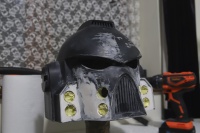
15/04/25 Final photos, finally. I added a little black wash to the pipes just dirty them up ands make them look less new, could probably do more but it's good enough for me.
I'm happy enough with the final result, the surface finish is a little rough here and there but it's easy to pass off as wear and tear on a helmet that's seen potentially centuries of combat, the lenses look great considering they're made from dirt cheap visors,
the padding isn't perfect but as mentioned previously it's not possible to install a proper solution & they keep the helmet on my head well enough.
I will say I wish I had the space for a proper photo studio but I have to make do with cleaning my work bench and using some foam tiles as a back drop and working with natural light for the most part- in the past I had a cheap photography table and LED lights
but it was more hassle that it was worth to set it up and dismantle it in my living room- these pictures will have to do to show off my work, so, yeah... enjoy.
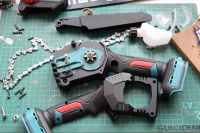
FUNCTIONAL CHAINSWORD PROJECT 20/10/24 If you know about a Youtuber by the name of 'Integza', then you may have an idea where this is going... :D
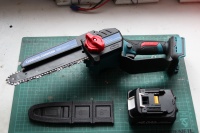
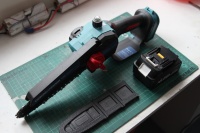
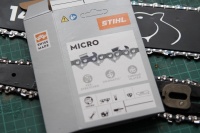
03/08/25 After a little research I opted for a cordless Brushless 8 inch mini chainsaw to use as the base for this project; lazy, yes, but efficient- no sense in trying to build a functional chainsaw from scratch.
I found a nice one for a very reasonable price including battery and charger for a about 50 quid, and perhaps more importantly I liked the overall shape and styling, kinda shaped like a Gurkha Kukri, which is important because I was never going to build a full-sized chainsword, I wanted something a little different, like a combat knife style item.
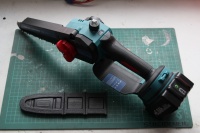
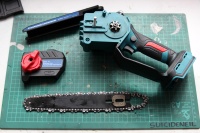
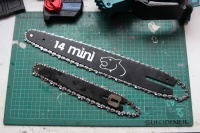
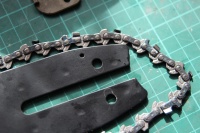
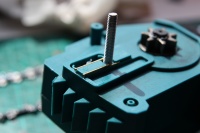
Anyway, after testing the saw by chopping up an old dead tree that had fallen down outside of home and discovering this little thing was surprisingly powerful for its size ( brushless motors and lithium batteries for the win ), I gave it a good clean and removed the chain guard, bar and chain with the intention of fitting a 14 inch bar in its place, just to make it a little more dangerous than necessary.
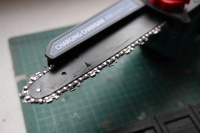
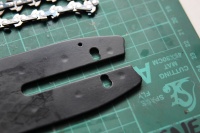
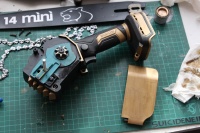
At this point we see that it uses a quick-adjust chain tensioner that does work well, but isn't a direct fit onto the larger bar. Not a problem, I scribed where I needed to do some filing and made a couple notches so that the tensioner will fit perfectly, and it does.
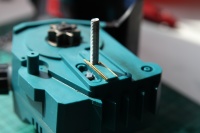
Next up I need to install a couple 1mm shims either side of the raised section that the slot in the end of the bar locates into the hold the bar in place; the original bar has a 6.5mm slot, the larger one is 8.5mm. I ordered some 1mm brass square bar, just need to wait for it to arrive in a few days before I can continue. Until then...
22/08/25 My brass bar came in though it seems I should have ordered a slightly longer piece; my inability to think through properly strikes again. I ended up cutting the bar into 4 pieces and stacking them up, 2 on each side and gluing them in place with some CA glue, once that had dried I test-fitted the 14 inch bar and it is a perfect fit, no wiggle at all, which was nice.
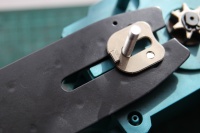
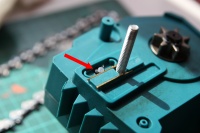
01/10/25 Beginning on the blade guard, I needed to relocate the peg that it sits on as the new chainsaw bar is a bit more girthy than the original, resulting in the chain contacting it when mounted in place. I cut off the peg and glued it back in place slightly further up- I also redrilled the hole to use a longer screw, meaning the peg won't just snap off easily which was an obvious issue.
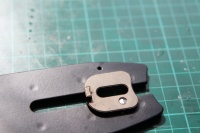
18/10/25 Take two on the blade guard. Aluminium came in, whizzed off one edge on the band saw with the metal cutting blade fitted resulting in possibly the straightest cut I've ever managed, then cut to length and rounded one corner. I got that bolted to the existing plastic guard and then tweaked the cover for the drive gear/tensioning mechanism for clearance by cutting away some plastic- nothing too drastic, just clearance for the larger chain bar, then gave the assembly a quick paint job to match the rest of the Chainsword.
18/01/26 Been a while, still alive. It decided to rain more or less non-stop for the last few months so no testing video, but I did take the final photos so that's something. Maybe when it warms up more and stops raining for more than a day or two I'll do a testing video for my Youtube channel, we'll see...
| ||||||||||||||||||||||||||||||||||||||||||||||||||||||||||||||||||||||||||||||||||||||||||||||||||||||||||||||||||||||||||||||||||||||